|
|
| Line 111: |
Line 111: |
| | | | |
| | Click back to return to the Weather Station app. | | Click back to return to the Weather Station app. |
| − |
| |
| − | ===Add Configuration Items ===
| |
| − |
| |
| − | {| border="0" cellpadding="10" width="100%"
| |
| − | |-
| |
| − | |width="50%" valign="top" align="left"|
| |
| − | **You can scan the two-dimension code below to get Weather Station APP.
| |
| − | |width="50%" valign="top" align="left"|
| |
| − | [[File:BlynkWeatherStationLink.png||300px|center]]
| |
| − | |}
| |
| − |
| |
| − |
| |
| − | {| border="0" cellpadding="10" width="100%"
| |
| − | |-
| |
| − | |width="50%" valign="top" align="left"|
| |
| − | *Also, you can make your own one.
| |
| − | *In this case, you can click the panel and call out '''WIDGET BOX''', on which you can see many choices.
| |
| − | |width="50%" valign="top" align="left"|
| |
| − | [[File:BlynkSetting3.png||200px|center]]
| |
| − | |}
| |
| − |
| |
| − |
| |
| − |
| |
| − | {| border="0" cellpadding="10" width="100%"
| |
| − | |-
| |
| − | |width="50%" valign="top" align="left"|
| |
| − | *Add '''Value Display''' item and name "temperature" to display '''Temperature value''' acquired.
| |
| − | *Select V2 on '''INPUT'''; Choose PUSH on '''READING FREQUENCY''', which indicates the temperature is sent from the Weather Station and the frequency is controlled by Microduino Client.
| |
| − | |width="50%" valign="top" align="left"|
| |
| − | [[File:BlynkSetting4.png||200px|center]]
| |
| − | |}
| |
| − |
| |
| − |
| |
| − |
| |
| − | {| border="0" cellpadding="10" width="100%"
| |
| − | |-
| |
| − | |width="50%" valign="top" align="left"|
| |
| − | The corresponding code at the Microduino Client is:
| |
| − | |width="50%" valign="top" align="left"|
| |
| − | <source lang="cpp">
| |
| − | void senTempHumi() {
| |
| − | am2321.read();
| |
| − | float sensor_tem = am2321.temperature / 10.0;
| |
| − | float sensor_hum = am2321.humidity / 10.0;
| |
| − | Blynk.virtualWrite(V2, sensor_tem);
| |
| − | Blynk.virtualWrite(V3, sensor_hum);
| |
| − |
| |
| − | oled(sensor_tem, sensor_hum, sensor_light, sensorPM25, Sensor_etoh);
| |
| − | }
| |
| − | </source>
| |
| − | |}
| |
| − |
| |
| − |
| |
| − |
| |
| − | {| border="0" cellpadding="10" width="100%"
| |
| − | |-
| |
| − | |width="50%" valign="top" align="left"|
| |
| − | * The setting of the humidity is similar with that of temperature; Set '''INPUT''' as V3 and send it through a timer function " senTempHumi()".
| |
| − | |width="50%" valign="top" align="left"|
| |
| − | [[File:BlynkSetting5.png||200px|center]]
| |
| − | |}
| |
| − |
| |
| − |
| |
| − |
| |
| − | {| border="0" cellpadding="10" width="100%"
| |
| − | |-
| |
| − | |width="50%" valign="top" align="left"|
| |
| − | * The frequency of the timer can be achieved by codes below:
| |
| − | |width="50%" valign="top" align="left"|
| |
| − | <source lang="cpp">
| |
| − | void senTempHumi() {
| |
| − | SimpleTimer temHumtimer;
| |
| − | temHumtimer.setInterval(2000L, senTempHumi);
| |
| − | }
| |
| − | </source>
| |
| − | |}
| |
| − |
| |
| − |
| |
| − |
| |
| − | {| border="0" cellpadding="10" width="100%"
| |
| − | |-
| |
| − | |width="50%" valign="top" align="left"|
| |
| − | * Set PM2.5's '''INPUT''' as V6, '''READING FREQUENCY''' as 5s, which represents frequency of the acquired PM2.5 data.
| |
| − | |width="50%" valign="top" align="left"|
| |
| − | [[File:BlynkSetting6.png||200px|center]]
| |
| − | |}
| |
| − |
| |
| − |
| |
| − |
| |
| − |
| |
| − |
| |
| − | {| border="0" cellpadding="10" width="100%"
| |
| − | |-
| |
| − | |width="50%" valign="top" align="left"|
| |
| − | * The corresponding code at the Microduino Client is:
| |
| − | |width="50%" valign="top" align="left"|
| |
| − | <source lang="cpp">
| |
| − | BLYNK_READ(V6) {
| |
| − | Blynk.virtualWrite(V6, sensorPM25);
| |
| − | }
| |
| − | </source>
| |
| − | |}
| |
| − |
| |
| − |
| |
| − | {| border="0" cellpadding="10" width="100%"
| |
| − | |-
| |
| − | |width="50%" valign="top" align="left"|
| |
| − | * Similarly, set the '''INPUT''' of the Light Sensor as V4 and the frequency is to get value every 3s.
| |
| − | |width="50%" valign="top" align="left"|
| |
| − | [[File:BlynkSetting7.png||200px|center]]
| |
| − | |}
| |
| − |
| |
| − |
| |
| − |
| |
| − |
| |
| − | {| border="0" cellpadding="10" width="100%"
| |
| − | |-
| |
| − | |width="50%" valign="top" align="left"|
| |
| − | * The corresponding code at the Microduino Client is:
| |
| − | |width="50%" valign="top" align="left"|
| |
| − | <source lang="cpp">
| |
| − | BLYNK_READ(V4) {
| |
| − | sensor_light = map(analogRead(A0), 0, 1023, 0, 255);
| |
| − | Blynk.virtualWrite(V4, sensor_light);
| |
| − | }
| |
| − | </source>
| |
| − | |}
| |
| − |
| |
| − |
| |
| − |
| |
| − |
| |
| − | {| border="0" cellpadding="10" width="100%"
| |
| − | |-
| |
| − | |width="50%" valign="top" align="left"|
| |
| − | * The '''INPUT''' of the methane gas is V5 and the frequency is to get value every 5s.
| |
| − | |width="50%" valign="top" align="left"|
| |
| − | [[File:BlynkSetting8.png||200px|center]]
| |
| − | |}
| |
| − |
| |
| − |
| |
| − |
| |
| − |
| |
| − | {| border="0" cellpadding="10" width="100%"
| |
| − | |-
| |
| − | |width="50%" valign="top" align="left"|
| |
| − | * The corresponding code at the Microduino Client is:
| |
| − | |width="50%" valign="top" align="left"|
| |
| − | <source lang="cpp">
| |
| − | BLYNK_READ(V5) {
| |
| − | Sensor_etoh= map(analogRead(A2), 0, 1023, 0, 30);
| |
| − | Blynk.virtualWrite(V5, Sensor_etoh);
| |
| − | }
| |
| − | </source>
| |
| − | |}
| |
| − |
| |
| − |
| |
| − |
| |
| − |
| |
| − | {| border="0" cellpadding="10" width="100%"
| |
| − | |-
| |
| − | |width="50%" valign="top" align="left"|
| |
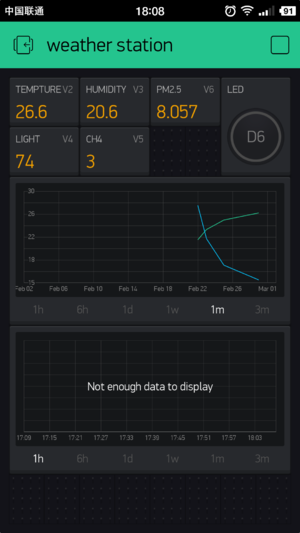
| − | *Finally, your phone panel turns into this:
| |
| − | |width="50%" valign="top" align="left"|
| |
| − | [[File:BlynkSetting12.png||200px|center]]
| |
| − | |}
| |
| | | | |
| | ==Programming== | | ==Programming== |
