Difference between revisions of "Open Source WiFi Weather Station"
(→Hardware Buildup) |
(→Hardware Buildup) |
||
| Line 149: | Line 149: | ||
==Hardware Buildup== | ==Hardware Buildup== | ||
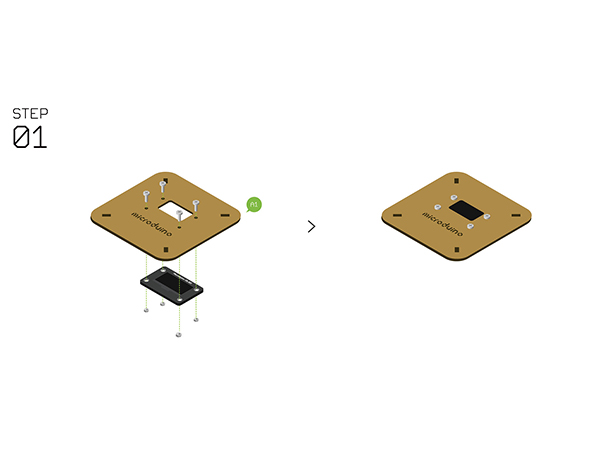
| − | + | ===Step 1=== | |
**Fixate [[Microduino-OLED]] and '''Structure-A1''' with screws. | **Fixate [[Microduino-OLED]] and '''Structure-A1''' with screws. | ||
[[File:Waetherstep1.jpg||600px|center]] | [[File:Waetherstep1.jpg||600px|center]] | ||
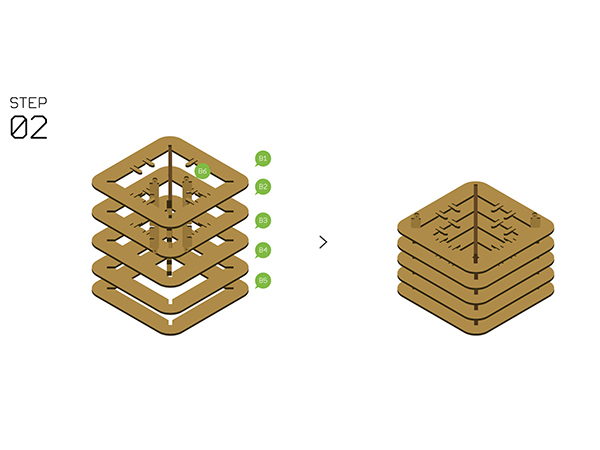
| − | + | ===Step 2=== | |
**Assemble '''Structure-B1~B5''' with '''Structure-B6'''. | **Assemble '''Structure-B1~B5''' with '''Structure-B6'''. | ||
[[File:Waetherstep2.jpg||600px|center]] | [[File:Waetherstep2.jpg||600px|center]] | ||
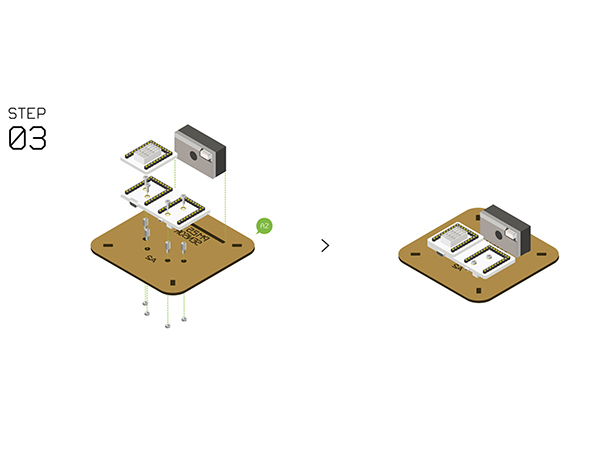
| − | + | ===Step 3=== | |
**Fixate [[Microduino-Duo-h]] / Microduino-Cube-S1 on '''Structure-A2''' with screws and nuts. | **Fixate [[Microduino-Duo-h]] / Microduino-Cube-S1 on '''Structure-A2''' with screws and nuts. | ||
**Stack the following modules on [[Microduino-Duo-h]] / Microduino-Cube-S1. | **Stack the following modules on [[Microduino-Duo-h]] / Microduino-Cube-S1. | ||
| Line 165: | Line 165: | ||
[[File:Waetherstep3.jpg||600px|center]] | [[File:Waetherstep3.jpg||600px|center]] | ||
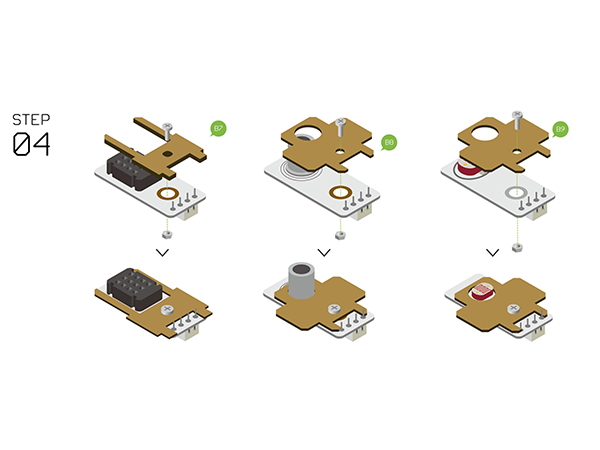
| − | + | ===Step 4=== | |
**Assemble the following sensors with '''Structure-B7, B8, B9'''. | **Assemble the following sensors with '''Structure-B7, B8, B9'''. | ||
***Temperature and humidity sensor[[Microduino-Temp&Hum]] | ***Temperature and humidity sensor[[Microduino-Temp&Hum]] | ||
| Line 171: | Line 171: | ||
***Light sensor[[Microduino-Light]] | ***Light sensor[[Microduino-Light]] | ||
[[File:Waetherstep4.jpg||600px|center]] | [[File:Waetherstep4.jpg||600px|center]] | ||
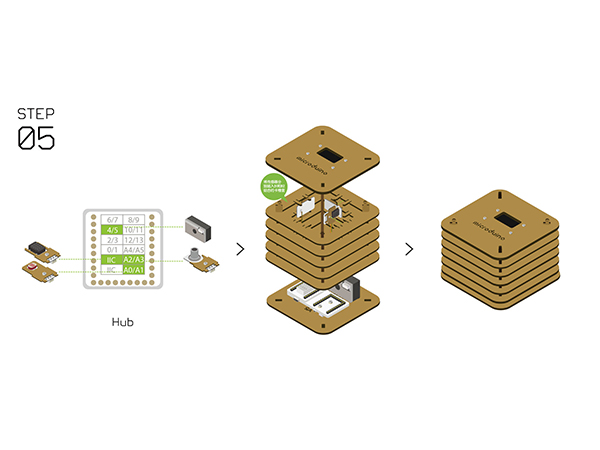
| − | + | ===Step 5=== | |
**Connect the sensors below to [[Microduino-Sensorhub]]. | **Connect the sensors below to [[Microduino-Sensorhub]]. | ||
***Temperature and humidity sensor[[Microduino-Temp&Hum]] | ***Temperature and humidity sensor[[Microduino-Temp&Hum]] | ||
| Line 180: | Line 180: | ||
[[File:Waetherstep5.jpg||600px|center]] | [[File:Waetherstep5.jpg||600px|center]] | ||
| − | + | ===Step 6=== | |
**Complete the steps above, then fixate with '''Structure-B0''' and plug in a USB cable. Congratulations! You just finished the buildup of the Weather Station. | **Complete the steps above, then fixate with '''Structure-B0''' and plug in a USB cable. Congratulations! You just finished the buildup of the Weather Station. | ||
| − | + | ===Step 7=== | |
| − | |||
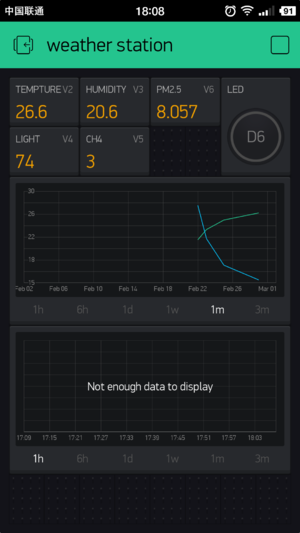
**You can see sensor data on [[Microduino-OLED]] after setting. | **You can see sensor data on [[Microduino-OLED]] after setting. | ||
**At the same time, you can also see uploaded data of the Weather Station on your phone Blynk. | **At the same time, you can also see uploaded data of the Weather Station on your phone Blynk. | ||
Revision as of 01:28, 19 December 2018
ContentsOutline
Introduction:
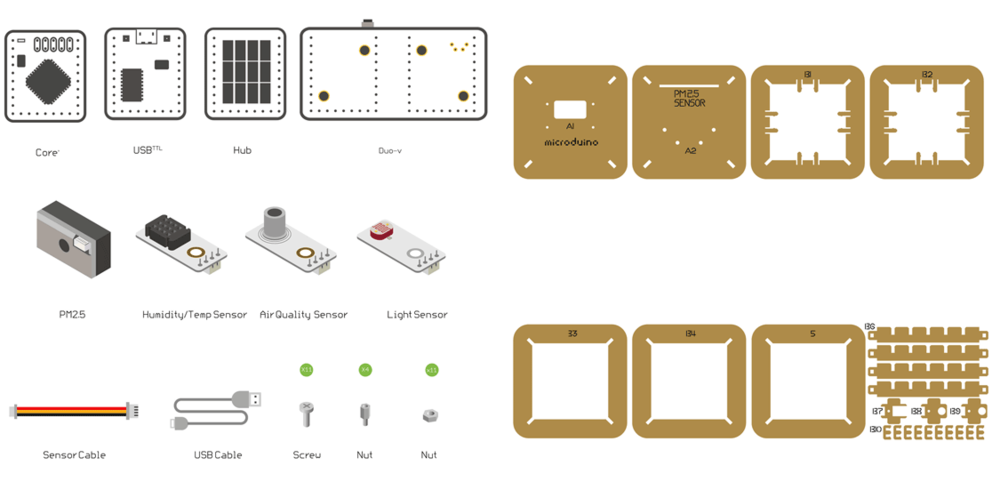
Bill of MaterialMicroduino Equipment
Other Equipment
Principle of the ExperimentThis Weather Station can detect data including:
Get and Configure BlynkNext, we'll learn how Microduino interacts with Blynk through the configuration process of the Weather Station. Download the Blynk AppVisit the Google Play Store or the Apple App Store and download the Blynk app. You'll need to setup an account with Blynk before proceeding. Please use a valid e-mail as your authentication tokens will be sent to that e-mail. Using the Blynk AppOn the main screen of the Blynk app. Click on the QR code scanner to scan the Weather Station app. Scan the QR code below. Once the project has loaded, click on Project Settings (nut icon). Under Auth Tokens, click on Email all. This will send the authentication token to your registered e-mail. Make note of this, as you will need this token later. Click back to return to the Weather Station app. ProgrammingSoftware SetupPlease follow the guide to ensure your software is correctly setup. The software is required to program the WiFi Weather Station. Download the latest software for your operating system and follow the getting started guides: Programming the Weather Station
Hardware BuildupStep 1
Step 2
Step 3
Step 4
Step 5
Step 6
Step 7
Notes
|
