Difference between revisions of "MDesigner"
(→Interface) |
(→Arduino Mode) |
||
| (4 intermediate revisions by the same user not shown) | |||
| Line 12: | Line 12: | ||
=Modes= | =Modes= | ||
mDesigner can interact with Microduino modules in two different modes. Each mode has its own pros and cons. It is recommended to use '''Live mode''' initially before exploring '''Arduino mode'''. | mDesigner can interact with Microduino modules in two different modes. Each mode has its own pros and cons. It is recommended to use '''Live mode''' initially before exploring '''Arduino mode'''. | ||
| + | |||
| + | '''Live''' mode is regular Scratch, but with added blocks which are designed to interact with Microduino modules. This means the user has access to the stage and actor blocks. Projects (hardware) need to be connected to the computer running mDesigner. mDesigner communicates with the project (hardware), namely the Core module, in "real time" over the USB connection by sending commands for the core module to perform. This means that "Live" mode requires a constant connection with the computer running mDesigner.<br><br> | ||
| + | '''Arduino''' mode acts as a "visual" drag and drop coding editor. The script (code) is converted to "Arduino" code and then compile and uploaded to the attached Core module. This means that code can run even when detached from the computer. The stage and actor are disabled in this mode since the code runs independent of mDesigner.<br> | ||
| + | |||
{| class="wikitable" style="text-align: left;" | {| class="wikitable" style="text-align: left;" | ||
| Line 52: | Line 56: | ||
Live mode also supports all of Scratch 3.0's default blocks which includes those that control the actor, stage and many more. | Live mode also supports all of Scratch 3.0's default blocks which includes those that control the actor, stage and many more. | ||
| − | [[ | + | <big>[[MDesigner:_Live_mode]]</big> |
==Arduino Mode== | ==Arduino Mode== | ||
| Line 63: | Line 67: | ||
Arduino mode also does not supports particular blocks. Blocks which interact with the actors and stages cannot be used. Other blocks will also be incompatible. | Arduino mode also does not supports particular blocks. Blocks which interact with the actors and stages cannot be used. Other blocks will also be incompatible. | ||
| − | [[ | + | <big>[[MDesigner:_Arduino_mode]]</big> |
=Supported Microduino Modules= | =Supported Microduino Modules= | ||
Latest revision as of 15:11, 13 August 2018
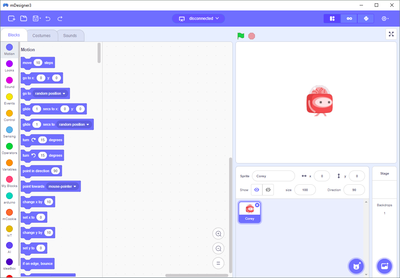
mDesigner is based on Scratch 3.0 with enhancements which allow the use of Microduino modules, sensors & trinkets in the drag-and-drop Scratch environment.
Contents
Software Setup
mDesigner runs on recent versions of Windows and Mac OS. The software setup guides can be found below.
Modes
mDesigner can interact with Microduino modules in two different modes. Each mode has its own pros and cons. It is recommended to use Live mode initially before exploring Arduino mode.
Live mode is regular Scratch, but with added blocks which are designed to interact with Microduino modules. This means the user has access to the stage and actor blocks. Projects (hardware) need to be connected to the computer running mDesigner. mDesigner communicates with the project (hardware), namely the Core module, in "real time" over the USB connection by sending commands for the core module to perform. This means that "Live" mode requires a constant connection with the computer running mDesigner.
Arduino mode acts as a "visual" drag and drop coding editor. The script (code) is converted to "Arduino" code and then compile and uploaded to the attached Core module. This means that code can run even when detached from the computer. The stage and actor are disabled in this mode since the code runs independent of mDesigner.
| Capability | Live Mode | Arduino Mode |
|---|---|---|
| Drag & Drop programming | Yes | Yes |
| Supports Microduino modules | Yes | Yes |
| Stage and actor enabled | Yes | No |
| Real time code testing | Yes | No |
| Code compiled and uploaded | No | Yes |
| Can run WITHOUT being connect to computer | No | Yes |
Live Mode
Live mode is a mode which requires a special piece of code to be uploaded onto the Core module or mCenter+. This special code is designed to receive commands from mDesigner and performs said commands. This means the user's script (program) actually resides in mDesigner. The execution of the user's script (program) occurs in real time when mDesigner sends commands over the USB connection to the Core module or mCenter+. None of the user's script (program) actually exists directly on the Core module or mCenter+. As a result, a user's script (program) cannot be executed if the Core module or mCenter+ is disconnected from the computer running mDesigner.
Scripts can be edited on mDesigner and immediately tested without having to compile and upload new code onto the Core module or mCenter+. This is possible because mDesigner can run the new script (program) by sending the appropriate commands in real time. This saves time by not having to compile and upload a new or modified script.
Live mode also supports all of Scratch 3.0's default blocks which includes those that control the actor, stage and many more.
Arduino Mode
Arduino mode is a mode which compiles a user's script (program) and uploads it directly onto the Core module or mCenter+. This means the user's script (program) actually resides on the Core module or mCenter+. As a result, a user's script (program) will still run on the Core module or mCenter+ even when NOT connected to the computer running mDesigner.
When using Arduino mode, scripts need to be compiled and uploaded onto the Core module or mCenter+. Compiling and uploading takes time. Whenever a modification is made to the script, it will be necessary to compile and upload in order see or observe the changes. This can be time consuming if constant changes are made in the user's script.
Optimal strategy when developing scripts would first to use Live mode to develop and test the script. Once the script is mostly tested and finalized, then translate from "Live mode script" to an "Arduino mode script" (some Live mode blocks cannot be used in Arduino mode).
Arduino mode also does not supports particular blocks. Blocks which interact with the actors and stages cannot be used. Other blocks will also be incompatible.
Supported Microduino Modules
- Core (328p)
- Core+ (644pa)
- mCenter+ (contains Core+)
